Whenever we
create any list in SharePoint, it has 3 pages associate with it.
- NewForm.aspx --- To add new entry into the list.
- EditForm.aspx --- To modify existing entry of the list.
- DisplayForm.aspx --- To Display selected entry of the list.
Now we want to
add new item in the list. Click on the “Add
new item” link.it will redirect to NewForm.aspx page
 |
| Open NewForm.aspx Page |
Enter values into the respective
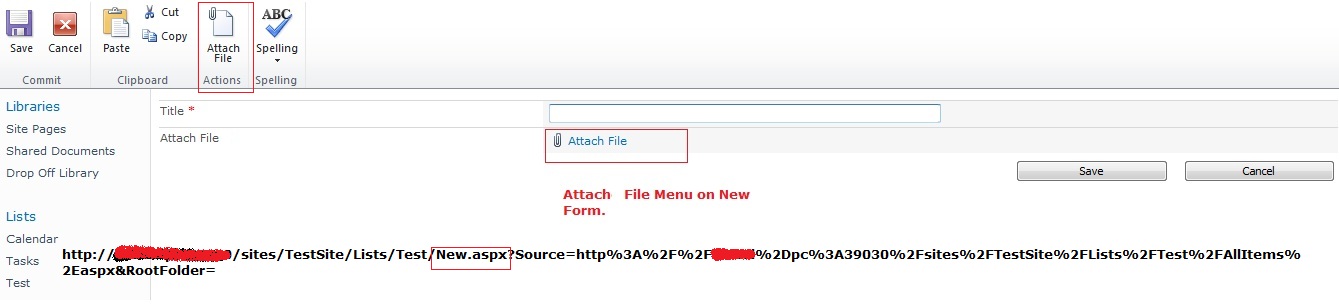
field.Now if user wants to attach any file with this current item,
user has to
click on attach file menu of ribbon
control.
 |
| Attach File Menu |
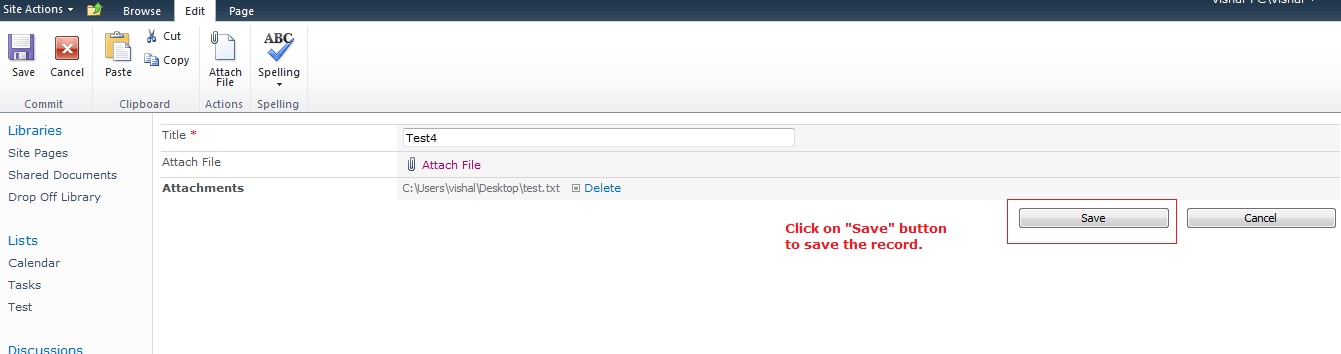
It will open new page for adding attachement to current item.
 |
| Attach File |
After attaching file will redirect to
below page.
 |
| Attached File View |
Now sometime
user wants attach file menu on form itself.so we have to create customize forms
for that list without disturbing original forms.(Default Forms)
1. Open site
with the help of SharePoint designer.
2. Select List
for which we need to create customizes forms.
 |
| SharePoint Designer List View |
 |
| Default Form View |
3. You will see default forms of selected list. Click on New for creation of new customize for the list. Give appropriate names to the forms and set those newly created forms as default by selecting each form and using set as a default option from FORMS menu or by checking “Set as default form for selected type” at the time of form creation.
 |
| Customize New Form Creation |
 |
| Set Form As Default Option |
4. Now open all
forms in SharePoint designer.
For New form:-
a)Find out the idAttachmentsRow tr.
b)Place below highlighted code above that TR.
 |
| IDATTACHMENT ROW |
b)Place below highlighted code above that TR.
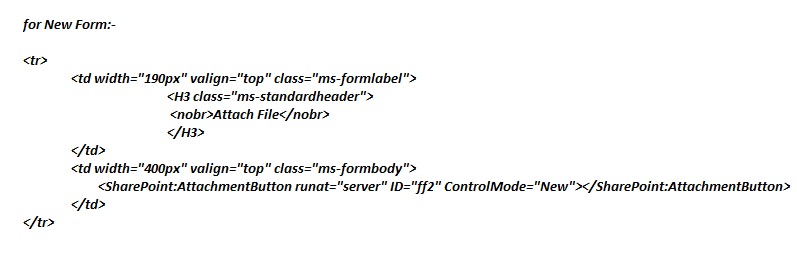 |
| Code For NewForm |
For Edit Form:-
a)Find out the idAttachmentsRow tr.
a)Find out the idAttachmentsRow tr.
 |
| IdAttachmentRow |
b)Place below highlighted code above that TR.
 |
| Code For Edit Form |
For Display Form:-
 |
| Navigation to View Item |
In Default Display Page Attachment is shown but when we create any customize display form for list we are not able to see the attachment even though attachment is present.
 |
| Default and Customize Display Form |
 |
| Code For Display Form. |
6. Save all files and Refresh the page.
a)Attach File option on New Form.
 |
| Customize New Form
b)Browse file and select it for Attachment.
|
 |
| File Attachment Option |
 |
| After Attachment
c)AllItems View.
|

d)Display Page with Attachments.
 |
| Customize Display Form |
e)Edit Item with attach file option.
 |
| Customize Edit Form |